
1、通过helm部署高可用harbor
这个是官方推荐的部署方式,架构模式如下图,使用外部的postgresql数据库集群,redis集群和分布式存储
1.1、helm安装高可用harbor
1.1.1、 环境配置
Kubernetes cluster 1.10+
Helm 2.8.0+
Highly available ingress controller
Highly available PostgreSQL 9.6+
Highly available Redis
PVC that can be shared across nodes or external object storage
1.1.2 架构
Harbor 的大部分组件现在都是无状态的,所以我们可以简单地增加 Pod 的副本数,确保组件分布到多个 Worker 节点上,并利用 K8S 的 Service 机制来保证 Pod 之间的连通性。
至于存储层,期望用户为应用程序数据提供高可用的 PostgreSQL 和 Redis 集群,以及用于存储图像和图表的 PVC 或对象存储。

1.1.3 helm chart 安装
安装链接参考https://artifacthub.io/packages/helm/harbor/harbor
helm repo add harbor https://helm.goharbor.io
helm fetch harbor/harbor --untar
1.1.4 配置values.yaml
配置 ingress url expose.ingress.hosts.core
配置 external url
配置 external postgresql
将
database.type设置为external,并在database.external部分填写信息。需要创建一个空数据库,默认情况下数据库设置为
registry,但可以通过设置coreDatabase来更改。
配置 external redis
将
redis.type设置为external,并在redis.external部分填写信息暂不支持TLS或Redis Cluster
配置 storage
建议使用支持以
ReadWriteMany方式跨节点共享的StorageClass来配置用于存储图像、图表和作业日志的卷,这样可以按需扩展组件。如果此类卷类型不是您的默认 StorageClass,则需要在以下位置进行设置:persistence.persistentVolumeClaim.registry.storageClasspersistence.persistentVolumeClaim.chartmuseum.storageClasspersistence.persistentVolumeClaim.jobservice.storageClass.
如果使用这样的
StorageClass,则需要将以下字段的相关 accessMode 设置为ReadWriteMany:persistence.persistentVolumeClaim.registry.accessModepersistence.persistentVolumeClaim.chartmuseum.accessModepersistence.persistentVolumeClaim.jobservice.accessMode
或者,通过设置以下方式使用现有的 PVC 来存储数据:
persistence.persistentVolumeClaim.registry.existingClaimpersistence.persistentVolumeClaim.chartmuseum.existingClaimpersistence.persistentVolumeClaim.jobservice.existingClaim
最后,如果您没有支持
ReadWriteManyStorageClass 或者不希望使用,可以使用外部对象存储来存储图像和图表,并将作业日志存储在数据库中。要启用外部对象存储,请将persistence.imageChartStorage.type设置为您想要的值,并填写相应的部分,并将jobservice.jobLogger设置为database
配置replicas
Set
portal.replicas,core.replicas,jobservice.replicas,registry.replicas,chartmuseum.replicas, ton(n>=2).
1.1.5 安装
helm install my-harbor harbor/harbormy-harbor 为发布时的名称,可自定义
1.2、通过ingress方式配置harbor
1.2.1 安装ingress-nginx
通过helm安装ingress-nginx
helm repo add ingress-nginx https://kubernetes.github.io/ingress-nginx
helm repo update
helm fetch ingress-nginx/ingress-nginx --untar
创建命名空间并修改service的暴露模式为nodeport
helm upgrade --install ingress-nginx ingress-nginx/ingress-nginx \
>   --namespace ingress-nginx --create-namespace \
>   --set controller.service.type=NodePort
1.2.2 修改harbor的ingress配置
部署harbor仓库,使用ingress暴露服务。ingress-nginx使用的是NodePort方式暴露自身,需要在externalURL中配置其 NodePort 端口号:
# ingress-nginx NodePort https端口为30376
[root@k8smaster ingress-nginx]# kubectl get svc |grep ingress
my-ingress-nginx-controller             NodePort       10.96.30.87     <none>        80:31744/TCP,443:30376/TCP   22h
my-ingress-nginx-controller-admission   ClusterIP      10.96.10.242    <none>        443/TCP                      22h

# 执行helm安装,指定为ingress暴露,指定域名,externalURL,密码及StorageClaas
helm upgrade --install harbor harbor/harbor --namespace harbor --create-namespace \
  --set expose.type=ingress \
  --set expose.ingress.className=nginx \
  --set expose.ingress.hosts.core=slw.registry.cn \
  --set expose.ingress.hosts.notary=notary.test.com \
  --set externalURL=https://slw.registry.cn:30376 \
  --set harborAdminPassword="Harbor12345" \
  --set persistence.persistentVolumeClaim.registry.storageClass="nfs-client" \
  --set persistence.persistentVolumeClaim.jobservice.jobLog.storageClass="nfs-client" \
  --set persistence.persistentVolumeClaim.database.storageClass="nfs-client" \
  --set persistence.persistentVolumeClaim.redis.storageClass="nfs-client" \
  --set persistence.persistentVolumeClaim.trivy.storageClass="nfs-client"
# 查看ingress
[root@k8smaster ingress-nginx]# kubectl get ingress
NAME               CLASS   HOSTS             ADDRESS       PORTS     AGE
myharbor-ingress   nginx   slw.registry.cn   10.96.30.87   80, 443   8d
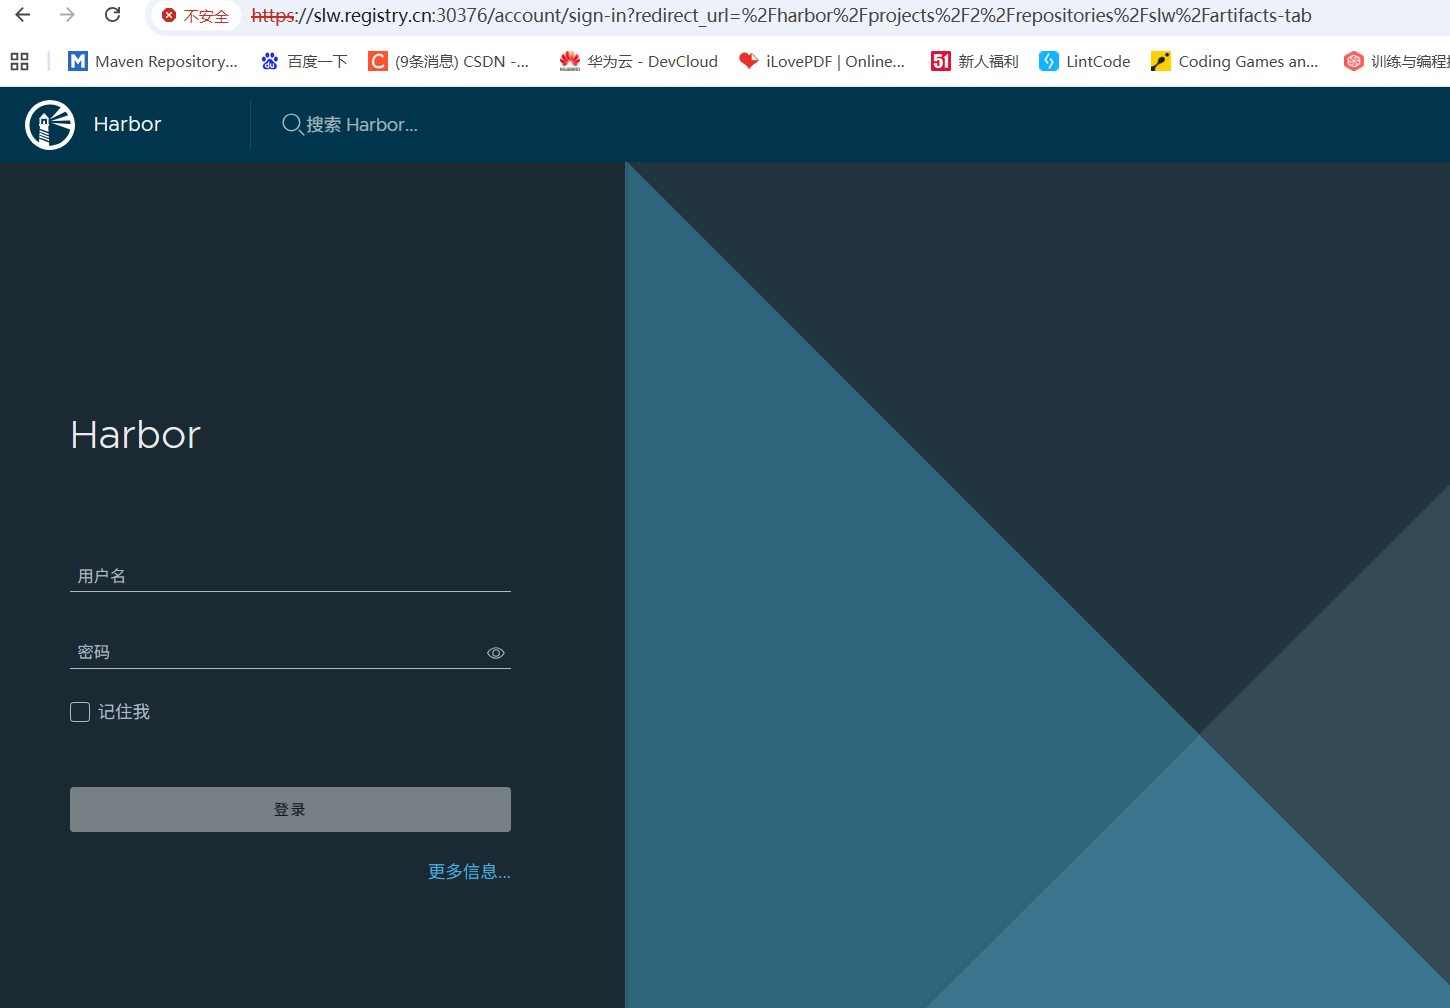
客户端访问测试,在客户端配置域名解析,slw.registry.cn解析到ingress-nginx节点IP,访问https://slw.registry.cn:30376:
1.2.3、客户端上传镜像
导出ca.crt证书
kubectl get secrets myharbor-ingress -o jsonpath="{.data.ca\.crt}" | base64 -d >ca.crt将证书复制到客户端docker的certs.d的文件夹下
# linux
mkdir -p /etc/docker/certs.d/slw.registry.cn:30376
cp ca.crt /etc/docker/certs.d/slw.registry.cn:30376

# windows 由于文件夹不能设置特殊字符
文件夹名称为slw.registry.cn_30376
配置hosts解析
echo "10.168.1.125 slw.registry.cn" >>/etc/hosts
测试登录
docker login slw.registry.cn:30376 -u slw
推送镜像
docker tag slw:latest slw.registry.cn:30376/hz258/slw:latest
docker push slw.registry.cn:30376/hz258/slw:latest
1.3 通过nodePort方式部署harbor
上述使用ingress方式部署依赖nginx-ingress控制器,如果为了简化部署,可以使用NodePort方式:
export node_ip=10.168.1.125
helm upgrade --install harbor harbor/harbor --namespace harbor --create-namespace \
  --set expose.type=nodePort \
  --set expose.tls.auto.commonName=$node_ip \
  --set externalURL='https://$node_ip:31234'
  --set harborAdminPassword="Harbor12345" \
  --set persistence.persistentVolumeClaim.registry.storageClass="nfs-client" \
  --set persistence.persistentVolumeClaim.jobservice.jobLog.storageClass="nfs-client" \
  --set persistence.persistentVolumeClaim.database.storageClass="nfs-client" \
  --set persistence.persistentVolumeClaim.redis.storageClass="nfs-client" \
--set persistence.persistentVolumeClaim.trivy.storageClass="nfs-client"通过https://$node_ip:31234直接访问harbor。
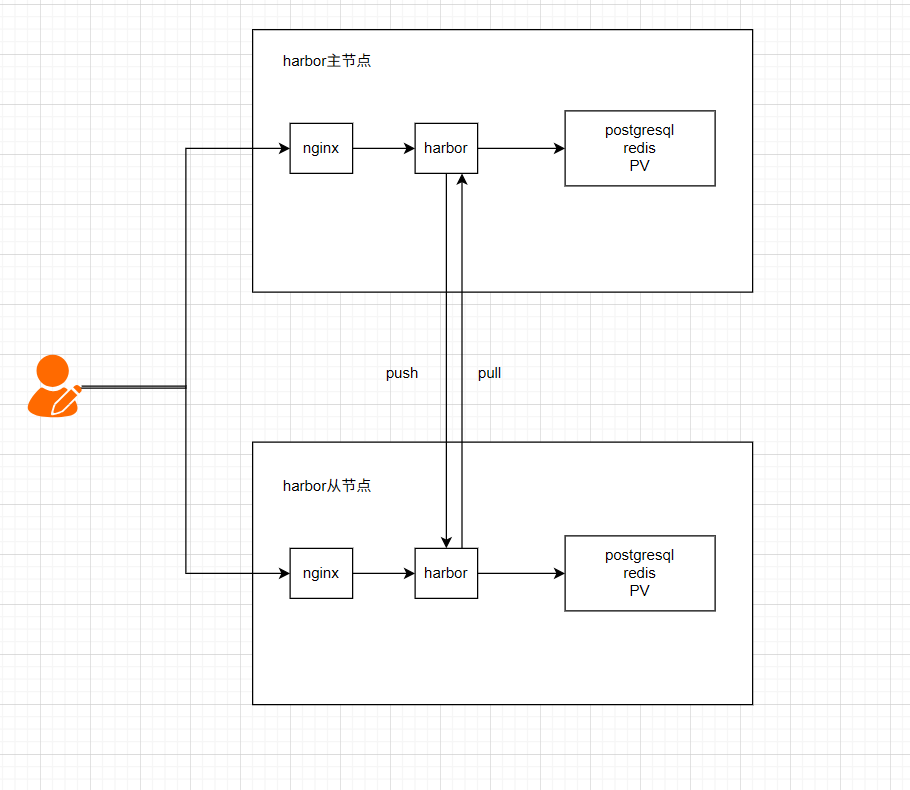
2、通过设置主从harbor实现高可用
上面我们介绍了官方的部署方式,这种方式需要使用到多台服务器,资源开销大,对于中小企业并不适用,下面介绍另一种高可用方式,只需要两台harbor服务器互为主备,通过nginx与keeplived实现负载均衡,两台harbor之前设置定时的推送和拉取。
2.1、设置主从harbor
2.1.1、环境配置
2.2.2、架构
2.2.3、配置harbor主节点
下载离线包
下载离线安装包解压到/usr/local/目录下
wget https://github.com/goharbor/harbor/releases/download/v2.13.2/harbor-offline-installer-v2.13.2.tgz

tar zxvf harbor-offline-installer-v2.13.2.tgz -C /usr/local/
修改harbor.yml
# Configuration file of Harbor

# The IP address or hostname to access admin UI and registry service.
# DO NOT use localhost or 127.0.0.1, because Harbor needs to be accessed by external clients.
# 修改主机ip
hostname: 192.168.8.71

# http related config
http:
  # port for http, default is 80. If https enabled, this port will redirect to https port
  port: 8080

# https related config
# 如果没有配置SSL,注释HTTPS
#https:
  # https port for harbor, default is 443
#  port: 443
  # The path of cert and key files for nginx
#  certificate: /etc/nginx/conf.d/yang.cn.crt
#  private_key: /etc/nginx/conf.d/yang.cn.key
  # enable strong ssl ciphers (default: false)
  # strong_ssl_ciphers: false

# # Harbor will set ipv4 enabled only by default if this block is not configured
# # Otherwise, please uncomment this block to configure your own ip_family stacks
# ip_family:
#   # ipv6Enabled set to true if ipv6 is enabled in docker network, currently it affected the nginx related component
#   ipv6:
#     enabled: false
#   # ipv4Enabled set to true by default, currently it affected the nginx related component
#   ipv4:
#     enabled: true

# # Uncomment following will enable tls communication between all harbor components
# internal_tls:
#   # set enabled to true means internal tls is enabled
#   enabled: true
#   # put your cert and key files on dir
#   dir: /etc/harbor/tls/internal


# Uncomment external_url if you want to enable external proxy
# And when it enabled the hostname will no longer used
external_url: https://harbor.yang.cn

# The initial password of Harbor admin
# It only works in first time to install harbor
# Remember Change the admin password from UI after launching Harbor.
harbor_admin_password: Harbor12345

# Harbor DB configuration
database:
  # The password for the user('postgres' by default) of Harbor DB. Change this before any production use.
  password: root123
  # The maximum number of connections in the idle connection pool. If it <=0, no idle connections are retained.
  max_idle_conns: 100
  # The maximum number of open connections to the database. If it <= 0, then there is no limit on the number of open connections.
  # Note: the default number of connections is 1024 for postgres of harbor.
  max_open_conns: 900
  # The maximum amount of time a connection may be reused. Expired connections may be closed lazily before reuse. If it <= 0, connections are not closed due to a connection's age.
  # The value is a duration string. A duration string is a possibly signed sequence of decimal numbers, each with optional fraction and a unit suffix, such as "300ms", "-1.5h" or "2h45m". Valid time units are "ns", "us" (or "µs"), "ms", "s", "m", "h".
  conn_max_lifetime: 5m
  # The maximum amount of time a connection may be idle. Expired connections may be closed lazily before reuse. If it <= 0, connections are not closed due to a connection's idle time.
  # The value is a duration string. A duration string is a possibly signed sequence of decimal numbers, each with optional fraction and a unit suffix, such as "300ms", "-1.5h" or "2h45m". Valid time units are "ns", "us" (or "µs"), "ms", "s", "m", "h".
  conn_max_idle_time: 0

# The default data volume
# 依据实际情况修改存储目录
data_volume: /data/harbordata
安装harbor
mkdir -p /data/harbordata

./prepare && ./install.sh
配置nginx
我们在 Harbor 前面配置一个 Nginx 反向代理,处理入口流量,SSL 也交给 Nginx 处理。
http {
    log_format  main  '$remote_addr - $remote_user [$time_local] "$request" '
                      '$status $body_bytes_sent "$http_referer" '
                      '"$http_user_agent" "$http_x_forwarded_for"';
    access_log  /var/log/nginx/access.log  main;
    sendfile            on;
    tcp_nopush          on;
    tcp_nodelay         on;
    keepalive_timeout   65;
    types_hash_max_size 4096;
    map $http_upgrade $connection_upgrade {
        default upgrade;
        ''      close;
    }
    include /etc/nginx/conf.d/*.conf;
    server {
        listen 443 ssl;
        server_name harbor.yang.cn;
        # SSL配置
        ssl_certificate      /etc/nginx/conf.d/harbor.yang.cn.crt;
        ssl_certificate_key  /etc/nginx/conf.d/harbor.yang.cn.key;
        # 禁用不必要的HTTP方法限制
        add_header Allow "GET, POST, HEAD, PUT, DELETE, OPTIONS, PATCH" always;
        if ($request_method !~ ^(GET|HEAD|POST|PUT|DELETE|PATCH|OPTIONS)$) {
            return 405;
        }
        location / {
            proxy_pass http://harbor_backend;
            # 代理 header
            proxy_set_header Host $host;
            proxy_set_header X-Real-IP $remote_addr;
            proxy_set_header X-Forwarded-For $proxy_add_x_forwarded_for;
            proxy_set_header X-Forwarded-Proto $scheme;
            proxy_set_header X-Original-URI $request_uri;
            # 认证相关 header
            proxy_set_header Authorization $http_authorization;
            proxy_pass_header Authorization;
            proxy_pass_header WWW-Authenticate;
           # WebSocket和长连接支持
            proxy_http_version 1.1;
            proxy_set_header Upgrade $http_upgrade;
            proxy_set_header Connection $connection_upgrade;
            # 大文件上传支持
            client_max_body_size 0;
            proxy_buffering off;
            proxy_request_buffering off;
            # 方法支持
            proxy_method $request_method;
        }
    }
    # Harbor后端服务器组
    upstream harbor_backend {
        # 使用ip_hash保持会话一致性
        ip_hash;
        # 配置本机 Harbor 监听的端口
           server 192.168.8.71:8080 weight=1 max_fails=3 fail_timeout=30s;
    }
}
修改静态解析
修改 /usr/local/harbor/docker-compose.yml 文件,给两个容器添加静态 DNS 解析。
在 core 和 jobservice 两个 service 下添加静态解析,需要注意 解析的 IP 地址是 harbor-02 服务器的。
  core:
    extra_hosts:
    - "harbor.yang.cn:192.168.8.72"
    image: goharbor/harbor-core:v2.13.2


  jobservice:
    extra_hosts:
    - "harbor.yang.cn:192.168.8.72"
    image: goharbor/harbor-jobservice:v2.13.2
修改后重启harbor
docker compose down -v
docker compose up -d
2.2.4、配置harbor从节点
配置基本一样,需要注意的是更改相应的ip地址
下载离线包
下载离线安装包解压到/usr/local/目录下
wget https://github.com/goharbor/harbor/releases/download/v2.13.2/harbor-offline-installer-v2.13.2.tgz

tar zxvf harbor-offline-installer-v2.13.2.tgz -C /usr/local/
修改harbor.yml
# Configuration file of Harbor

# The IP address or hostname to access admin UI and registry service.
# DO NOT use localhost or 127.0.0.1, because Harbor needs to be accessed by external clients.
# 修改主机ip
hostname: 192.168.8.72

# http related config
http:
  # port for http, default is 80. If https enabled, this port will redirect to https port
  port: 8080

# https related config
# 如果没有配置SSL,注释HTTPS
#https:
  # https port for harbor, default is 443
#  port: 443
  # The path of cert and key files for nginx
#  certificate: /etc/nginx/conf.d/yang.cn.crt
#  private_key: /etc/nginx/conf.d/yang.cn.key
  # enable strong ssl ciphers (default: false)
  # strong_ssl_ciphers: false

# # Harbor will set ipv4 enabled only by default if this block is not configured
# # Otherwise, please uncomment this block to configure your own ip_family stacks
# ip_family:
#   # ipv6Enabled set to true if ipv6 is enabled in docker network, currently it affected the nginx related component
#   ipv6:
#     enabled: false
#   # ipv4Enabled set to true by default, currently it affected the nginx related component
#   ipv4:
#     enabled: true

# # Uncomment following will enable tls communication between all harbor components
# internal_tls:
#   # set enabled to true means internal tls is enabled
#   enabled: true
#   # put your cert and key files on dir
#   dir: /etc/harbor/tls/internal


# Uncomment external_url if you want to enable external proxy
# And when it enabled the hostname will no longer used
external_url: https://harbor.yang.cn

# The initial password of Harbor admin
# It only works in first time to install harbor
# Remember Change the admin password from UI after launching Harbor.
harbor_admin_password: Harbor12345

# Harbor DB configuration
database:
  # The password for the user('postgres' by default) of Harbor DB. Change this before any production use.
  password: root123
  # The maximum number of connections in the idle connection pool. If it <=0, no idle connections are retained.
  max_idle_conns: 100
  # The maximum number of open connections to the database. If it <= 0, then there is no limit on the number of open connections.
  # Note: the default number of connections is 1024 for postgres of harbor.
  max_open_conns: 900
  # The maximum amount of time a connection may be reused. Expired connections may be closed lazily before reuse. If it <= 0, connections are not closed due to a connection's age.
  # The value is a duration string. A duration string is a possibly signed sequence of decimal numbers, each with optional fraction and a unit suffix, such as "300ms", "-1.5h" or "2h45m". Valid time units are "ns", "us" (or "µs"), "ms", "s", "m", "h".
  conn_max_lifetime: 5m
  # The maximum amount of time a connection may be idle. Expired connections may be closed lazily before reuse. If it <= 0, connections are not closed due to a connection's idle time.
  # The value is a duration string. A duration string is a possibly signed sequence of decimal numbers, each with optional fraction and a unit suffix, such as "300ms", "-1.5h" or "2h45m". Valid time units are "ns", "us" (or "µs"), "ms", "s", "m", "h".
  conn_max_idle_time: 0

# The default data volume
# 依据实际情况修改存储目录
data_volume: /data/harbordata
安装harbor
mkdir -p /data/harbordata

./prepare && ./install.sh
配置nginx
我们在 Harbor 前面配置一个 Nginx 反向代理,处理入口流量,SSL 也交给 Nginx 处理。
http {
    log_format  main  '$remote_addr - $remote_user [$time_local] "$request" '
                      '$status $body_bytes_sent "$http_referer" '
                      '"$http_user_agent" "$http_x_forwarded_for"';
    access_log  /var/log/nginx/access.log  main;
    sendfile            on;
    tcp_nopush          on;
    tcp_nodelay         on;
    keepalive_timeout   65;
    types_hash_max_size 4096;
    map $http_upgrade $connection_upgrade {
        default upgrade;
        ''      close;
    }
    include /etc/nginx/conf.d/*.conf;
    server {
        listen 443 ssl;
        server_name harbor.yang.cn;
        # SSL配置
        ssl_certificate      /etc/nginx/conf.d/harbor.yang.cn.crt;
        ssl_certificate_key  /etc/nginx/conf.d/harbor.yang.cn.key;
        # 禁用不必要的HTTP方法限制
        add_header Allow "GET, POST, HEAD, PUT, DELETE, OPTIONS, PATCH" always;
        if ($request_method !~ ^(GET|HEAD|POST|PUT|DELETE|PATCH|OPTIONS)$) {
            return 405;
        }
        location / {
            proxy_pass http://harbor_backend;
            # 代理 header
            proxy_set_header Host $host;
            proxy_set_header X-Real-IP $remote_addr;
            proxy_set_header X-Forwarded-For $proxy_add_x_forwarded_for;
            proxy_set_header X-Forwarded-Proto $scheme;
            proxy_set_header X-Original-URI $request_uri;
            # 认证相关 header
            proxy_set_header Authorization $http_authorization;
            proxy_pass_header Authorization;
            proxy_pass_header WWW-Authenticate;
           # WebSocket和长连接支持
            proxy_http_version 1.1;
            proxy_set_header Upgrade $http_upgrade;
            proxy_set_header Connection $connection_upgrade;
            # 大文件上传支持
            client_max_body_size 0;
            proxy_buffering off;
            proxy_request_buffering off;
            # 方法支持
            proxy_method $request_method;
        }
    }
    # Harbor后端服务器组
    upstream harbor_backend {
        # 使用ip_hash保持会话一致性
        ip_hash;
        # 配置本机 Harbor 监听的端口
           server 192.168.8.72:8080 weight=1 max_fails=3 fail_timeout=30s;
    }
}
修改静态解析
修改 /usr/local/harbor/docker-compose.yml 文件,给两个容器添加静态 DNS 解析。
在 core 和 jobservice 两个 service 下添加静态解析,需要注意 解析的 IP 地址是 harbor-01 服务器的。
  core:
    extra_hosts:
    - "harbor.yang.cn:192.168.8.71"
    image: goharbor/harbor-core:v2.13.2


  jobservice:
    extra_hosts:
    - "harbor.yang.cn:192.168.8.71"
    image: goharbor/harbor-jobservice:v2.13.2
修改后重启harbor
docker compose down -v
docker compose up -d
2.2、配置镜像拉取和推送
主harbor配置
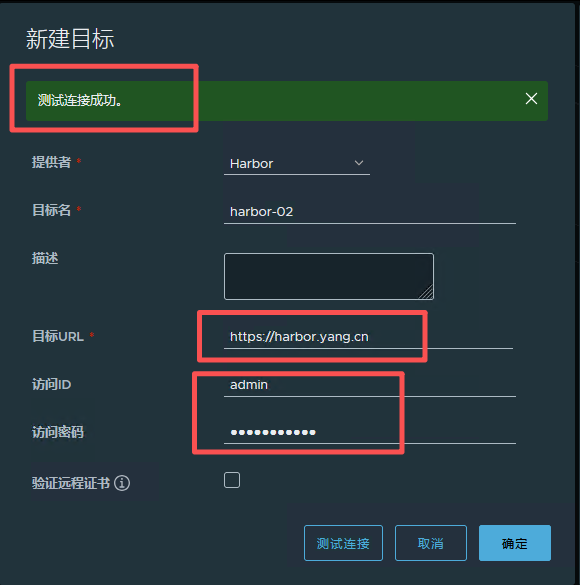
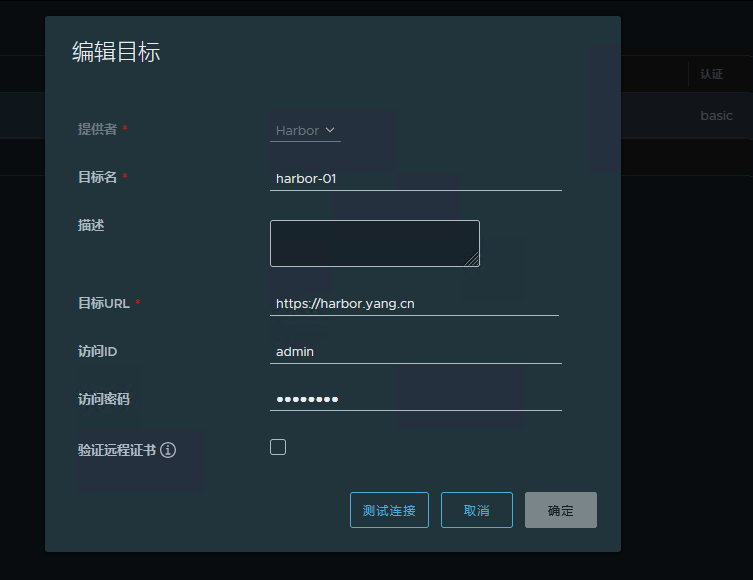
系统管理 -> 仓库管理 -> 新建目标 ,指向 Harbor-02
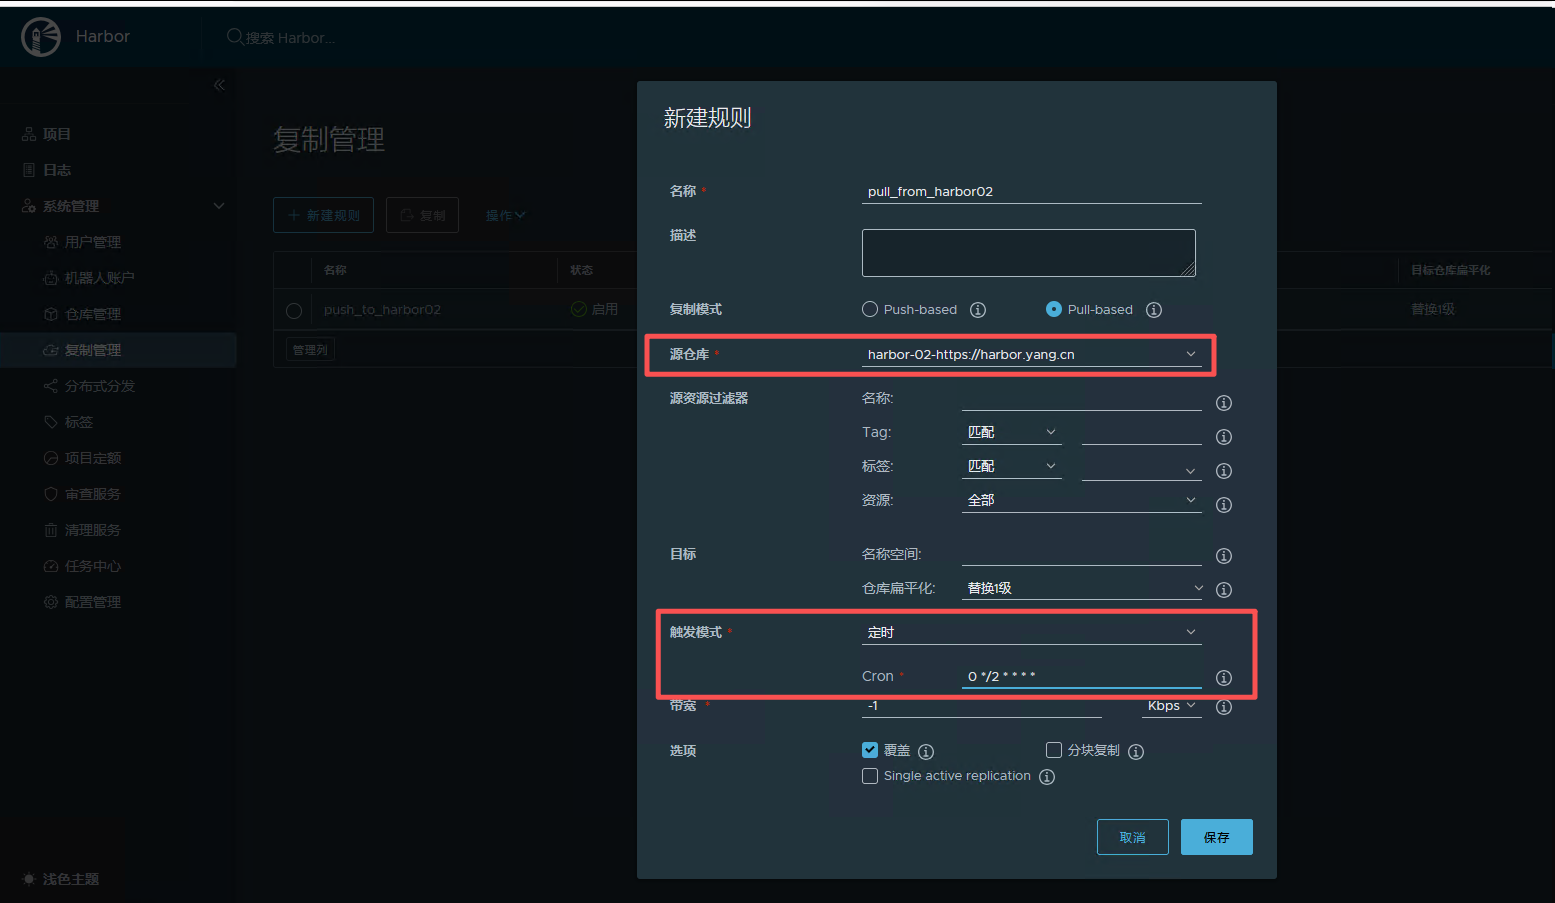
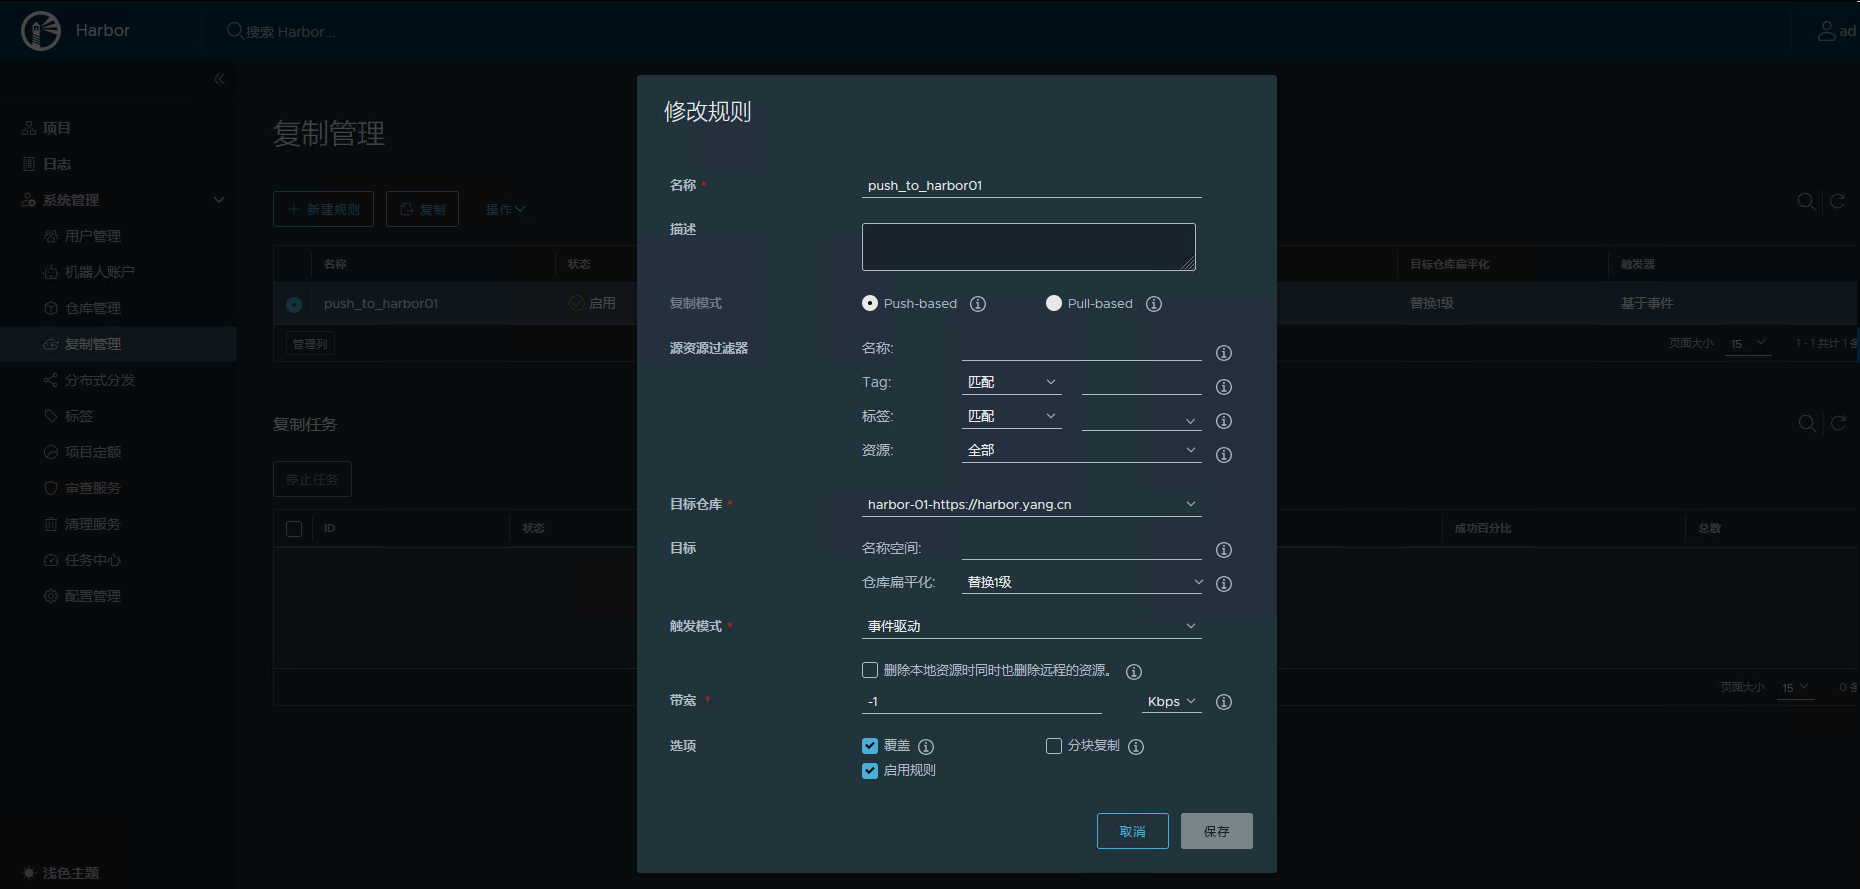
复制管理中主动推送镜像到 Harbor-02
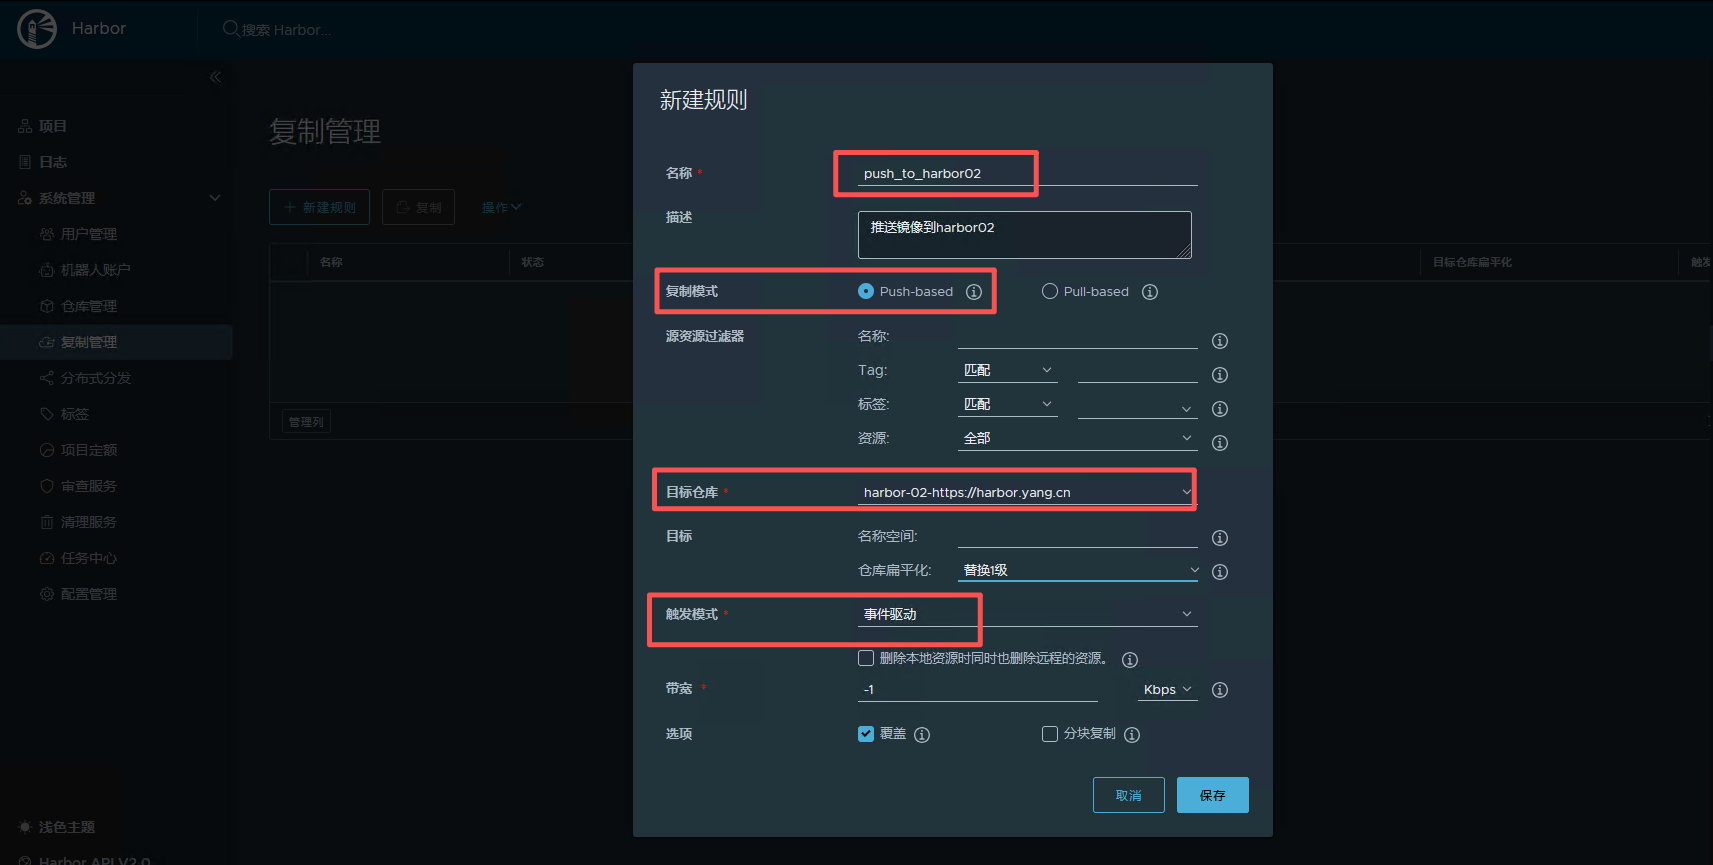
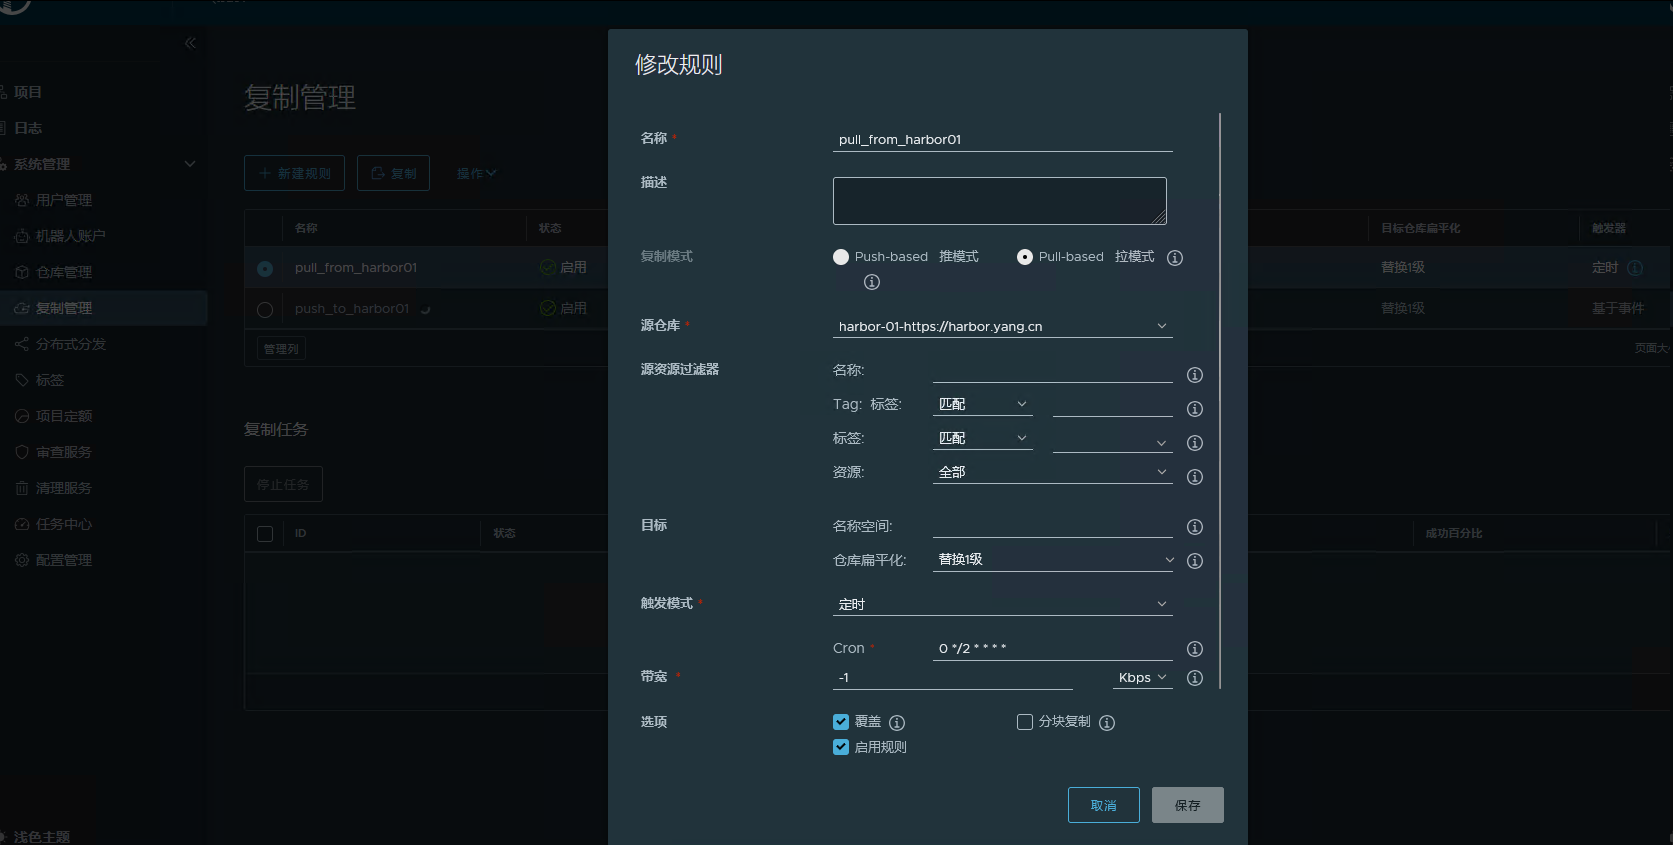
定时从 Harbor-02 拉取镜像
从harbor配置
系统管理 -> 仓库管理 -> 新建目标 ,指向 Harbor-01
主动推送镜像到 Harbor-01
定时从 Harbor-01 拉取镜像
参考连接:
https://goharbor.io/docs/2.13.0/install-config/harbor-ha-helm/